 biuro@elektrobim.pl
 91 817 14 69


Why does someone need an electric actuator with a simple radio control?
In many areas, simplicity in execution and operation is a priority. You don’t need big and complicated systems to do simple activities. Nay! Simple systems have the undeniable advantage over complex ones that they are… Simple! ? And if they are simple, they also cause much less trouble. They are less failure-prone, if only because of the smaller number of components that could break.
That is why I am starting a series of short articles presenting simple solutions to unusual problems. In them, I will provide complete recipes for achieving the intended goal.
First case: Electric actuator with simple 12V radio control.
Where can an electric actuator be used?
The actuator with a simple radio controller will be useful wherever you need to:
- Open a high-placed window in: a production hall, a greenhouse, a high attic in the house, etc.
- Eject something out of the wall, ceiling or floor: a bed, a TV set, a projector, a hidden alcohol bar – so that your wife doesn’t see and your buddies don’t think you are henpecked, etc.
- Open the hatch to the basement.
- Close or open the door, e.g. in a cupboard.
- Pull out the drawer from the desk.
- Raise or lower the table-to.
- Open the smoke flap in the staircase (if it does not open automatically after smoke is detected by the sensor).
- Steer portable road sign.
- Remotely control vehicles or engines: e.g. adjustment of the accelerator and brake pedals.
- Operate flight simulators or toy machines.
- Open the blinds remotely…
…or whatever you just want to do with them :)
What is needed to build such a system?
We will need:
- 12V DC electric actuato (parameters adjusted to the needs, i.e. force, extension, speed and dimensions must be appropriate to the task). The entire range of 12-Volt actuators is available at Elektrobim.pl
- 2-channel radio remote control with remote controls – also available at Elektrobim.pl
- 12V DC power supply The power supply is used only when the system is to be powered from the 230V AC mains voltage. When powered by a battery or solar installation, the power supply is not necessary.
- Cabling – two-wire cables are enough for everything.
How to connect the electric actuator to the controller?
It is always a good idea to start with assembling the system “on the table” first to check that all the pieces of the puzzle are working properly.
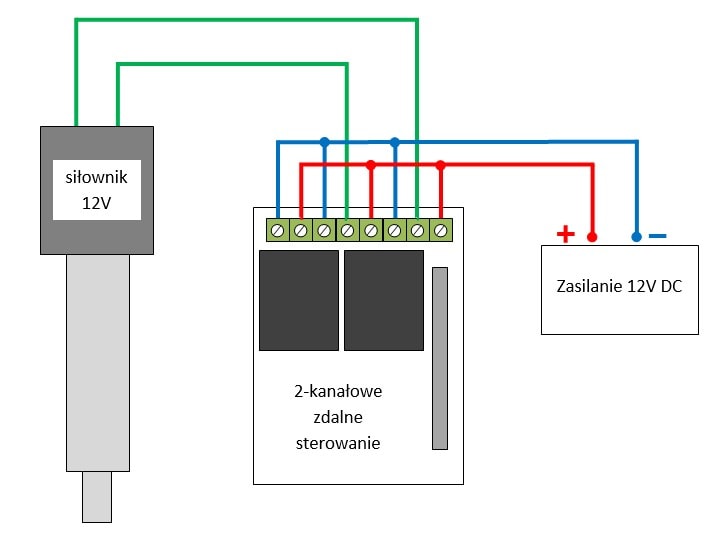
The system should be assembled according to the simple diagram shown in the drawing. All connections must be made carefully so as not to cause a short circuit in the system. You don’t have to worry about the polarity of the cables connecting the actuator with the radio remote control (green in the diagram).
During assembly “on the table”, you can immediately program the two-channel controller in the selected operating mode (the programming manual is always included with the controller):
- monostable – if you want the actuator to work as long as you hold down the button on the remote control
- bistable – if you want one short press of the remote control button to open or close the actuator.
If you know exactly what extension the actuator is to work with to accomplish your task, you can adjust it right on the table. You need to set the limit switches there – of course only if the limit switches in the actuator are adjustable. If they are, there will be a description of how to do it in the actuator manual.
When everything is working “on the table”, all you need to do is install the actuator in the place intended for it in your structure and it’s ready! ? Just remember to fasten the actuator firmly so that nothing can break under load. But if the actuator must rotate with the moved element, then take care of the appropriate pins as well. Leave the actuator free to move in the mounting holes (do not tighten the screws in the mounting eyelets of the actuator to the limit because you will make its movement more difficult and you will cause an unnecessary increase in resistance on the pins). Route the power cable so that it will not be pinched during operation. Also, make sure to leave adequate slack in the cable – especially in those places where it will bend.
You can also correct the polarity of the power supply on the actuator, if necessary. If you want the actuator to extend at the push of a button with an open padlock and close with a closed padlock, and the opposite is happening, then swap the actuator power cables and it’s ready! :)
Summary
I don’t know if you expected it to be so brilliant in its simplicity! ? Many things can be done just in this simple way. Electric actuators with such a simple controller can be used in many other applications besides those mentioned above. If you have any idea to make your life easier, in which you could use an electric actuator, and you were afraid to implement it due to the expected complexity of the system, I hope that with this short article I have dispelled your doubts ?
I have something equally interesting for the next post. It will be about an automatic door to the chicken coop, opening and closing automatically without your involvement, at set times. You will be surprised how easy it can be! :)


