 biuro@elektrobim.pl
 91 817 14 69


How to correctly install actuators to the gate?
Gate automation can make life much easier for those who have it installed on their gate. But with incorrect assembly, it can also complicate it greatly.
Of course, the selection and installation of the actuator can be delegated to someone else, so you transfer the responsibility for it. However, you can also do everything on your own, which will result in measurable savings, but also enormous satisfaction with the task performed.
As it turns out in practice, the selection of equipment for the gate and its assembly is not as difficult as it may seem. We try to share knowledge in this area and make it easier for people to deal with issues that seem complex for them.
You can read about the selection of gate actuators here or watch on our YouTube channel.
When it comes to selecting the mounting points for the actuator on the gate, we provide an excellent tool that calculates everything for you – our calculator is available here.
However, this article will go a little further. I will explain to you how to install the actuators on your gate so that they work properly and as long as possible without failure.
I will present 3 cases, and you will choose the right one for you.
But before I continue, first…
General rules of conduct during assembly.
During the mechanical assembly of the actuators on the swing gate, the list of activities looks exactly the same in each case:
- Of course, start with reading the instructions ? I know that people rather don’t like reading them, but on the other hand, the instruction for the machine is not a bulky encyclopedia, only a few pages of text with drawings. Take a look at it and you will surely avoid many complications during assembly and costly damage to the equipment when the assembly is not in accordance with the instructions.
- Get the tools ready. In most cases, basic tools that every DIY enthusiast has in his workshop are sufficient: a drill (hammer drill if you drill in a brick post or wall), a few wrenches, pliers, screwdrivers … Tools do not have to be ultra-expensive and from the top shelf, but they must be in good condition so that they do not threaten your safety (EHS is always cool ?)
- Measure the gate and post. It is especially about all the necessary dimensions that need to be entered into our calculator.
- Measure or read from the actuator manual the folded and unfolded dimensions of the actuator. If the actuator cannot extend or retract to the end of the threads on the propeller, be sure to take this into account.
- Enter all dimensions into the calculator and save the results.
- Prepare the mountings for the post. It may be necessary to assemble them in advance to maintain some of the dimensions specified by our calculator.
- Try on the mounts on the post and mark the mounting holes to keep the dimensions indicated with the calculator. If you screw the mounts to the post – drill holes. Then screw the mounts on the post (or weld them, if this is the technique of fixing you chose).
- Determine the place of fixing the mount on the gate wing according to the calculator. Fix the mount on the gate wing.
- When you have the mounts on the post and gate wings ready, you can put the actuator on them.
- Make a test run with the gate with the actuator installed. This way you will check the correctness of assembly. The correctly mounted actuator will allow you to open the gate to the angle you entered in the calculator. If somewhere you have not kept the dimensions you may find that the position of the mounts needs to be corrected. If that’s the case, don’t underestimate it and make the appropriate changes right away. This will significantly extend the life of your actuator.
Now let’s take a look at the three cases I have promised ?
- The gate on narrow posts opens to the inside of the property.
I start with this because, according to the information we have, this is the most common case.
Take a look at the diagram below. The calculator will ask you to enter a few dimensions which are marked in this drawing:
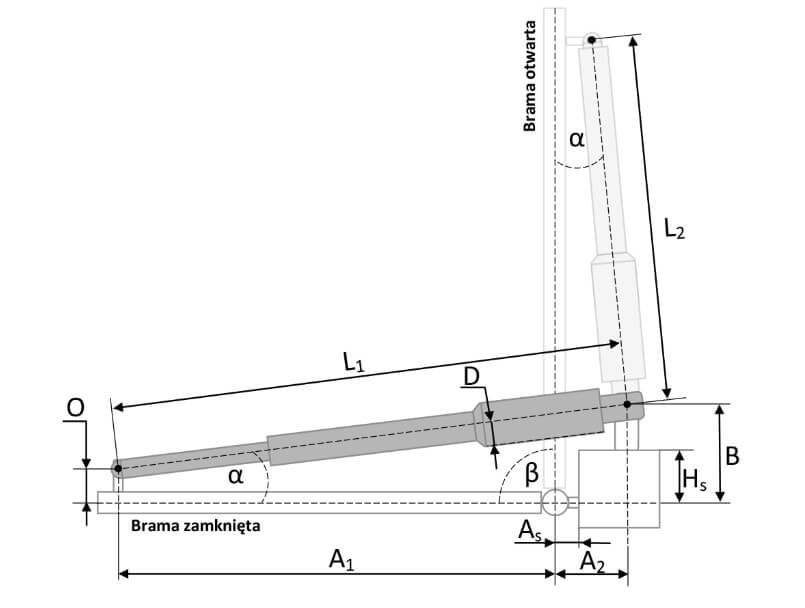
Enter the appropriate dimensions, do it as accurately as possible, then fix the mounts to the post and gate wing according to the results returned by the calculator.
Place the actuator on the mountings and make a test run of the gate. If the gate has reached the assumed opening angle, then everything is fine – the operation was successful! ?
If you want to see what it looks like in practice, watch our instructional video for mounting the actuator on a narrow post at the gate that opens inwards:
The gate on wide posts opens into the property.
This is the second most common case. The diagram will be the same as in the previous case, so I won’t repeat it here.
In accordance with the previously presented procedure, measure all the distances and dimensions requested by the calculator, enter them into the form and read the results.
Install the mounts on the post taking care to maintain the appropriate dimensions. When attaching the mount to the (usually) brick post, make sure that it is done solidly – use appropriate wall / concrete anchors. After fixing the mounts on the post and gate wing, make a test run and check that the gate reaches the assumed opening angle. When it’s OK, you’re done :)
If you want to watch the whole process, take a look here :)
The gate opens to the outside of the property (wide and narrow post).
This is the least numerous group of cases, therefore it is at the very end. This time the layout diagram will change and look like this:
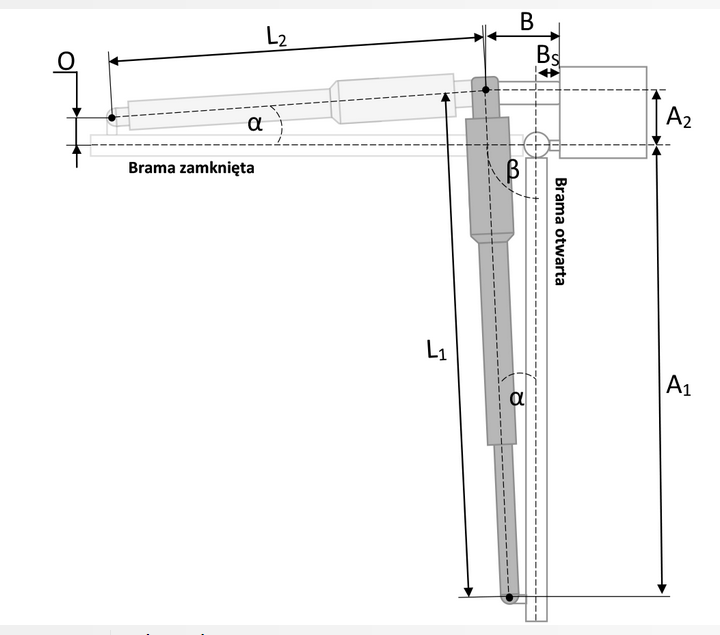
As in any of the previously discussed examples, also this time you have to take the dimensions requested by the calculator. Then enter them into it and read the results. Attaching the mounts to the post, note that the actuator pin location on the post must be in the door’s clearance so that the actuator can push it out. Therefore, it forces a different arrangement of the mounting on the post than if opening the gate to the inside of the property. In this case, the passage width of the gate will slightly decrease. And again: screw the mounts on the wing and the post, put the actuator on them, and then check if the gate opens to the assumed angle. If everything is OK, you can have a well-deserved cold beer :)
We also have an instructional video recorded for the case in question :)
Finally, the only thing left to do is to take care of the control panel, e.g. ETM-DG2 if we choose the ETM series sets
Summary
Installing the actuators on the gate may seem complicated only at first glance. But it doesn’t really have to be that way. We have provided a suitable tool that does a lot of work in determining the attachment points for you – do not be afraid to use it :)
If you only have a little “knack” for DIY, you have the right tools and you have some free time, you can try to install the actuators on your gate yourself.
And when you succeed – satisfaction is guaranteed! :D
Zobacz też:
 Samodzielny montaż napędu do bramy – Czy warto?

… i dlaczego tak? Zobacz wady i zalety samodzielnego montażu


