 biuro@elektrobim.pl
 91 817 14 69


A hatch for the basement or attic with a remote control
Welcome back!
We want to help our customers, so we never remain indifferent to requests for the selection of an actuator for an attic or basement hatch. Since there are quite many phone calls with such requests, I decided to write a short article about it.
Therefore, this time you will read about how to make such a hatch with one of our actuators, what to pay attention to, and how to deal with the selection of the actuator attachment points.
So without further ado, let’s see how you can make an automatic hatch appear also at your home. Enjoy the article :)
Which actuator should you choose?
It all depends on where the hatch is located. If inside the building, you probably care about the smooth and quiet operation of the actuator, so you don’t wake your sleeping children when you want to go down to the cellar in the evening for good wine because you are spending the evening with your wife ? Here I can recommend our FDI actuators (you can check them here).
But if the basement hatch is outside, it probably does not have to be the quietest actuator in the world – then you can choose something cheaper, which works less quiet, but the hatch will also be opened easily ? You can take a look at our offer for SPJ HARL actuators.
But since our customers have hatches at home much more often than outside, maybe it’s worth to write a few words about FDI actuators…
First of all: they are quiet and work extremely reliable. They are not noiseless, but they are very quiet, and the sound they make – at least for me – is very pleasant to the ear. It sounds “technical”, but at the same time noble, like something “fancy”.
Second: the build quality is at a very high level. There are no flaws. There can’t be any, if the actuator is to be operated with high efficiency.
Thirdly: thanks to the use of very high-quality materials and maximally simplified construction, they are practically failure-free.
Fourth: many variants to choose from. From very strong actuators (force: 4000 N) with not very high speed (6 mm / s), through “medium” (force: 1500 N, speed: 20 mm / s), to fast but slightly weaker (force: 600 N, speed: 30 mm / s – this variant is not self-locking and could self-fold under a too heavy hatch). Various lengths are also available, so everyone will find something for themselves :)
And another big advantage: The rear mounting helps to conveniently mount the actuator and ensures that later nothing protrudes beyond the mounting points.
Speaking of the FDI actuator, the automatic hatch is just one of the many possible application options… Check it out! :D
How to choose the mounting points for the actuator on the hatch?
Many consider this stage the most difficult, but completely unnecessary! ? In this part of the article I will prove it to you and present a method for selecting mounting points so that you do not have to change the factory extension settings of the FDI actuator.
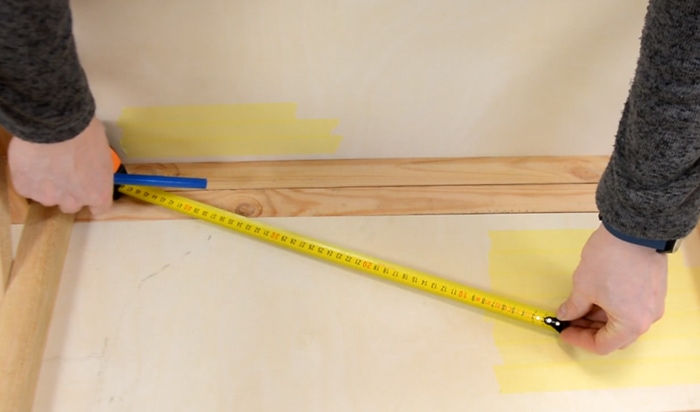
You will only need a pencil, painter’s tape, and a tape measure. That’s it!
The method of determining the mounting points of the actuator comes down to a few simple steps:
- Measure the distance between the mounting holes on the folded actuator and write down the result.
- Measure the distance between the mounting holes on the unfolded actuator and write down the result.
- Tape the area on the wall near the hinge (gray area in the picture below) with painter’s tape where the actuator will be screwed down at one end. You will later write on the tape with a pencil – it’s easier to remove the scribbles afterwards than if you wrote on the wall :)
- Apply painter’s tape to the place on the hatch where you expect to attach the other end of the actuator (red area on the hatch in the picture below). The same reason as above :)
- Pick any point near the hatch hinge on the wall to which one end of the actuator will be attached. Mark it with a pencil.

- ON THE CLOSED HATCH, measure the distance of the folded actuator from the point marked on the wall. Mark a point with a pencil on the painter’s tape on the hatch.
- ON THE HATCH OPENED TO THE REQUIRED ANGLE, measure the distance of the unfolded actuator from the point marked on the wall.
- Check if the measurement result from step 7 equals the point marked on the hatch in step 6. If so – CONGRATULATIONS! You have designated attachment points for the actuator ? Skip the next point.
- If the measurement result from step 7 does not match the point marked on the hatch in step 6, select the point on the wall again according to the rule: If the distance was too small – move the point on the wall away from the hinge. If the distance was too great, bring the point on the wall closer to the hinge. Go back to step 6.
- No more marking out the attachment points – you can attach the mounts :)
It’s simple, isn’t it? No complicated math ? Plus you can use the actuator straight out of the box – no limit switch settings! ?
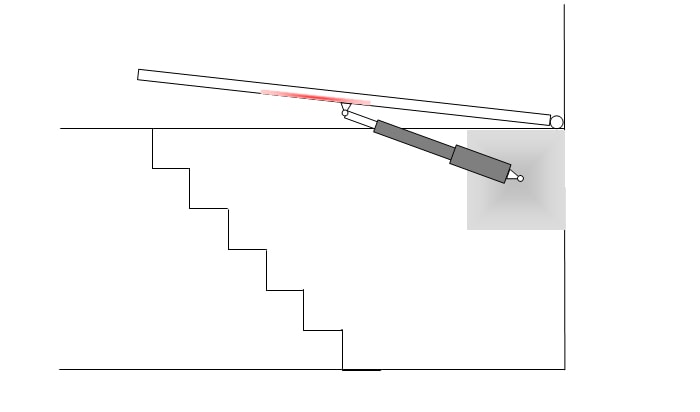
But be careful! When selecting the mounting points, you must make sure that the actuator is at an angle (in every position) with the hatch – the greater the angle, the better – you will definitely find the best one ?
Mechanical installation of the actuator to the hatch
Once you have the designated fixing points, you can screw the actuator to the structure. Start by mounting the actuator to the wall. Make it so that the axis of the rear actuator mounting hole aligns with the point marked on the wall at the hatch hinge. Only then does it make sense to mark these points in the previous part of the description.
Attach the actuator holder to the wall and place the actuator on it. Also, attach the holder to the other end of the actuator that will be attached to the hatch. DO NOT DRILL any mounting holes in the hatch yet.
Now very important! Close the hatch and only when it is closed, and the actuator fully folded, mark the place on the hatch for the second holder, drill holes for mounting the actuator, and then screw them to it.
Well done! :)
Actuator control
As there are many options, I will not describe them in detail, I will only mention two of them with a few words of explanation.
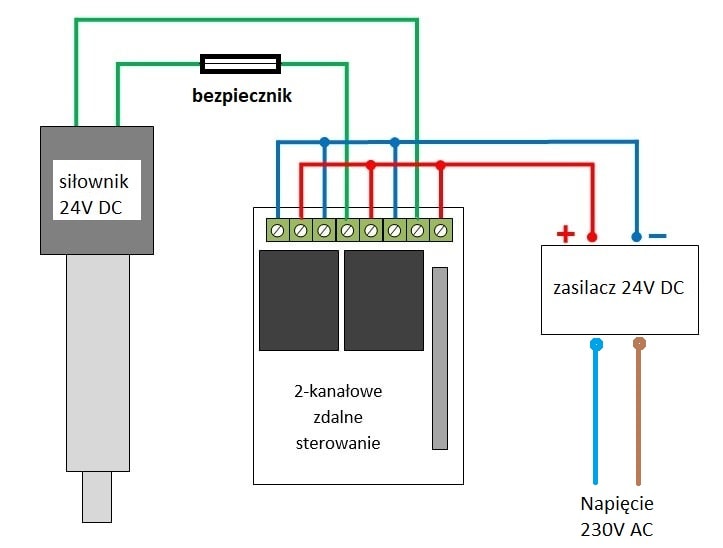
Remote control. Probably the most popular way to control an electric actuator in this type of application. All you need is a simple 2-channel controller and Bob’s your uncle. This controller is responsible for changing the polarity of the actuator supply voltage, and thus opens and closes the hatch. It is controlled by a radio remote control, so you don’t even have to get up from your armchair to open the hatch – your wife can go to the cellar for wine, if she wants to help you out :)
Manual switch control. The cheapest way. All you need is a switch that allows you to change the voltage polarity on the actuator. But with this option, unfortunately, you have to get up from the chair … ? On the other hand, it will make you healthier :)
For each of these variants, you will need a power supply, that will lower the 230V voltage to the voltage that the actuator must be powered with (in the case of FDI actuators it is 24V). Also, do not worry about the connection diagrams, which are not included here, because you will definitely receive them together with the purchased equipment.
You can see how the above-mentioned actuator control variants work in practice in one of our videos:
And don’t forget about safety – you don’t want the hatch to hurt someone when it closes. Our electronic fuse – overload module is perfect for the 2-channel radio controller. In the case of a manual switch control, it will be necessary to use a properly selected ordinary fuse, which will simply burn out when the actuator encounters an obstacle.
Automatic Hatch – Summary
A hatch to the attic or basement for everyone!
You too can live fashionable and comfortabl!
And now the bomb: Using this solution you can even rock the baby! :)
I went crazy with these slogans, I know ? But I think this article convinced you that it is not so difficult to make an automatic hatch yourself. Perhaps it even made you decide to make your life easier in this way.
In the video below, a fancy version of the attic hatch. :)
Zobacz też:
 Okno otwierane za pomocą siłownika elektrycznego
Możesz w prosty sposób zautomatyzować prace okna i siłownika elektrycznego. Dzięki czujnikom, otwieranie i zamykanie okna będzie odbywało się bez Twojej ingerencji.


