 biuro@elektrobim.pl
 91 817 14 69


How to build a control system with an electric actuator and a rain sensor?
In this short article, I’ll show you a simple layout that keeps the window closed when it’s raining – after all, we want to keep the house dry ?
Therefore, we hire an engineer, we buy professional actuators with a number of certificates, an industrial programmable controller and a rain sensor with a sharp scale for tiny sensitivity thresholds.
Although… It can be done cheaper and easier!
Why? Well, because the lower the complexity, the lower the failure rate. Not to exaggerate because there are also emergencies – you have to foresee them too, but more on that later.
What we will need
We will need simple components to assemble this system:
- 12V stabilized power supply with appropriate power for the used actuator and control system – cost: several dozen zlotys
- relay with double make-break contacts (DPDT) with a 12V coil, based on which the H bridge will be built (how does it work? See here [link to the article about the H bridge]) – cost: several zlotys
- rain sensor powered by 12V voltage with a relay output – cost: about a hundred
- a handful of wires to connect the system – cost: some pennies :)
- 12V electric actuator – cost: PLN 100 – 200 zł
- window – cost: you already have it, so you don’t have to buy one :)
Mounting the actuator to the window
In one of our videos, we presented an example of mounting the actuator to the window. How it will look at your place depends on how much space you have for installation and what type of window you need to automate. In any case of installation, remember that during its operation the actuator (in any position) mustn’t be parallel to the window axis. Below a video of the installation of thea LAD 150 mm actuator.
Installation of the electrical system
Before starting the assembly, make sure 1000% that the cable that you will use to bring the 230V voltage to the system is definitely not connected to this voltage yet. Remember! It is not 12V that can be touched with the tongue without harm to health :)
If you buy a power supply and a relay with a DIN rail socket, the mechanical assembly of the entire control is simplified. The rail will ensure durable and stable assembly of elements in such a way that you can place them next to each other and route the cables nicely arranged. This way you will achieve order in the system, and some even say that it works better because the electricity does not have to waste time looking for a way in the tangle of cables :)
Connect everything together according to the diagram below:
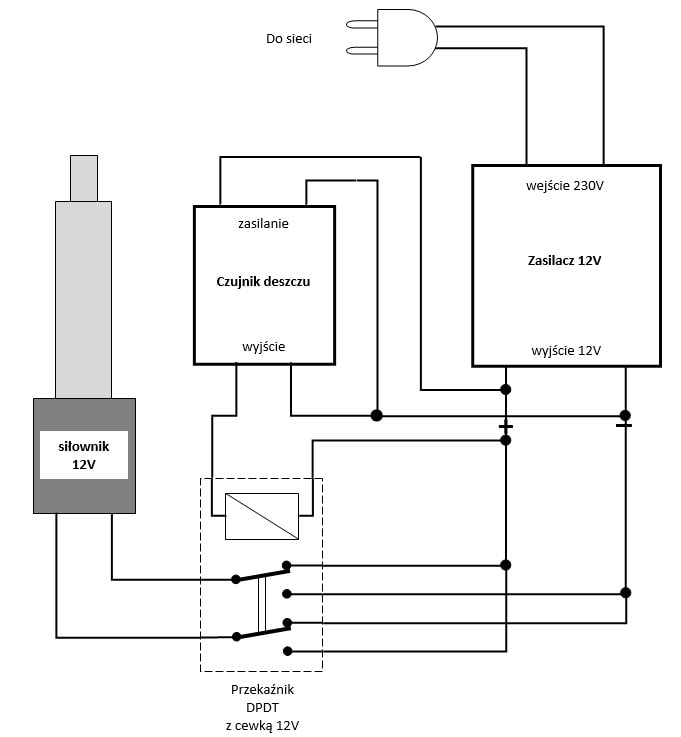
Briefly describing the above diagram, we can see that the positive pole from the power supply is simultaneously connected to:
- rain sensor power supply,
- one of the terminals of the relay coil, and
- terminals NC1 and NO2 of the relay (we call them so, just to name them somehow ?), on which we have built an H bridge (do you want to find out how such a bridge works? Click here)
On the other hand, we brought the negative pole of the power supply to:
- rain sensor power supply,
- one of the rain sensor output relay contacts, and
- NC2 and NO1 terminals of the relay (i.e. the H bridge)
The second contact of the rain sensor output relay is routed to the free end of the coil of the actuator control relay (i.e. our H-bridge).
Connections can be made with wires of one color, but it will be easier for you to control the system with wires of different colors, i.e. positive – red, negative – blue, etc.
Once again, I would like to remind you to be careful during assembly because the system includes parts connected to the 230V mains voltage, which can hurt you!
And if you were too hot…
It is possible to control the operation of the actuator using a temperature sensor, which we have also made a video about, and the connection methodology does not differ much from what we have presented above.
Window opening actuator – Summary
At the beginning I promised a few words about emergency situations that must be anticipated when installing such a system. Well, it can happen that something blocks the window (a hand, a pet trying to get into the house, or some other object). Prepare for this and remember about a properly selected fuse that will protect the actuator and the obstacle from damage. You can use a fuse that will burn out when an obstacle comes into contact with the window. You can also equip the system with some electronic fuse that will stop the actuator and allow it to restart when the obstacle is removed.
As you can see, the assembly of the system is not difficult, the cost of the whole thing is low, and the benefits are quite large ? So if you have a window somewhere that should work in automatic mode and close automatically when it rains, do not hesitate and make this contraption yourself :)
The layouts presented today can also be used:
- as a window control in a greenhouse based on sensor readings
- as a hatch control in a bakery or gastronomy to maintain a certain temperature
- in ventilation systems
- on automatic roof windows
- with fold-out roofs, canopies and awnings
- on yachts or ships to automatically close hatches during rain or storms
- as a simple flood sensor that would close the hatch or valve when the rain sensor is flooded.
Zobacz też:

Automatyczne drzwi do kurnika
Już nie musisz się martwić kto wypuści i zamknie drzwiczki kurom. Wystarczy siłownik i prosty układ z czasówką.


